When ever I run a cooking class or demonstration for my clients at the Port Hope CHC, I always look to see if I can include any vegetables that are in season and available from a local source within the community. I find that if I can incorporate fresh local vegetables that are readily available into my lessons, then clients are much more likely to try these recipes at home. During this time of year, it becomes a little more difficult to highlight local seasonal produce as most gardens have been put to bed for the winter. Over the next few months, I know the reliable root vegetables will be sneaking into quite a few dishes. However, root vegetables were a stand alone theme last week, so in planning for this week, I knew I would need to look elsewhere for variety. I actually did not have to look very far! Even though most gardens are empty, our modest CHC Sharing Garden has one vegetable that is able to keep on giving through the winter months....KALE!

I have used kale a number of times in cooking classes and demonstrations. It has been sauted with garlic, added to soups, dried into 'chips', chopped finely into a 'kale slaw' and even used for smoothies!
This week, I will be teaching a class all about pasta. My goal is to show
clients how to add flavour and variety to pasta dishes, and to explore some
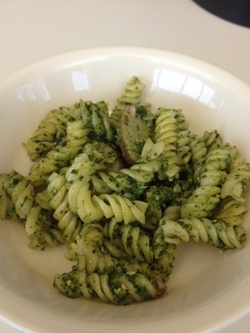
unique ways on how to include vegetables into these recipes. To highlight the kale, I have decided to try my hand at turning these leafy, sponge like greens into a pesto! Pesto is such a versatile spread. It can be used as the base of a pasta or pizza sauce, added to scrambled eggs, as a condiment on sandwiches, or as the start of a salad dressing.
clients how to add flavour and variety to pasta dishes, and to explore some
unique ways on how to include vegetables into these recipes. To highlight the kale, I have decided to try my hand at turning these leafy, sponge like greens into a pesto! Pesto is such a versatile spread. It can be used as the base of a pasta or pizza sauce, added to scrambled eggs, as a condiment on sandwiches, or as the start of a salad dressing.
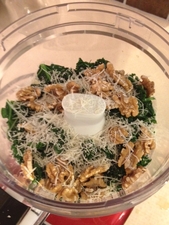
Kale Walnut Pesto
5 cups fresh kale, torn, ribs removed
¼ cup walnuts
1 clove garlic, peeled (more if desired)
¼ cup fresh grated parmesan cheese
Fresh ground pepper to taste
Pinch of salt
¼ cup extra virgin olive oil
Blanch kale for 3-5 minutes or until kale has wilted and softened. Drain, and squeeze out excess water.
In a small food processor, add all of the ingredients expect for the oil. Blend for a few seconds to roughly mix ingredients together. Add 1 tbsp of oil to the mixture, blend for a few seconds. Add another tbsp of oil, blend again. Repeat until the mixture is smooth and oil has been incorporated. Add 1 tbsp of water if consistency is too thick.
Keep covered in fridge for up to 5 days.
 RSS Feed